Advanced Ad Optimization on Amazon


Part 10 of 11 – This is the tenth part of a multi-step guide on how to succeed with Amazon ads. In this part, I will walk you through advanced ad optimization on Amazon using Excel. Excel skills will be incredibly useful in this step.
Advanced Ad Optimization on Amazon
I've covered almost everything about PPC, but as one of the final steps, I also want to go over how to perform more advanced ad optimization on Amazon using Excel. If you’re already well-versed in Excel, this should be straightforward, but if you’re less familiar, this will be very useful and a bit challenging.
To start with advanced ad optimization on Amazon using Excel, you first need to download the reports that contain your ad results in Excel format. You can find these Excel reports in your Campaign Manager’s left menu under "Reports." Click on "Create report." For the optimizations we’ve covered, you’ll need two different types of reports: "Search term" and "Targeting."
Positive Keywords
To find new keywords from your Explore campaigns to add to your Winner campaigns, open your Search Term report. Start by opening the filter tool.
Since we want to identify which keywords have actually resulted in sales, the first step is to filter out all keywords with $0 in sales. Therefore, go to the "7 Day Total Sales" column, click on the filter tool, and filter out "$0.00."
You will now have all the keywords that customers have actually searched for (Customer Search Term) and that have led to sales. You can also filter the "Campaign Name" and "Ad Group Name" columns to get different keywords for specific campaigns and Ad Groups. Then, you can easily extract them and place them into Exact/Product campaigns.
Negative Keywords
For advanced ad optimization on Amazon, minimizing costs is essential. To do this, we want to filter out all keywords that do not convert well or have a very low CTR without conversion. As you remember from earlier, we set up the following three rules to define new negative keywords:
- Keywords that have cost over $X and have not led to sales.
- Keywords that have received X number of clicks and have not converted.
- Keywords that have received more than 2500 impressions but with a CTR lower than 0.2%.
How you determine the value of X for the different rules was discussed earlier. I will now show how to apply the first rule in Excel, using $35 as my threshold. You can then use the same method to apply the other two rules as well. Start by opening your Targeting report. Then filter out all values in "7 Day Total Sales" except $0. Next, go to "Spend" and select "Greater than" followed by the value you want to use. In my case, it is $35.
Excel will now display all keywords that have spent more than $35 but have not generated any sales. These keywords can now be added as negative keywords in the campaigns (Negative Exact). Repeat the same steps but with filters tailored to the other two rules.
Optimal Bids
To set the optimal bid that we discussed earlier, you need to download another Excel file—this time from Amazon’s "Bulk Operations" page. You can find Bulk Operations in your Campaign Manager’s left menu. Bulk Operations allows you to download your ads in Excel format. You can then make changes (such as adjusting bids) and re-upload the same file to update your ads on Amazon. This way, you become really efficient with your ads. You can also use Bulk Operations when adding the negative and positive keywords we found in the previous steps. More on the benefits of Bulk Operations can be found here. Now, let's go through how to update the bids.
Filter the Data
The Bulk Operations file is similar to the Targeting Report we looked at earlier. It includes fields for sales, cost, CTR, and more. What differs is that there are individual rows for campaigns, Ad Groups, and more, not just for keywords as we’ve seen before. Therefore, you should start by filtering out these rows since campaigns and Ad Groups do not have their own bids (except for Sponsored Display ads). You should also filter out negative keywords since they do not have bids either. The filtering is easiest done by filtering out all negative keywords and blank rows in the "Match Type" column.
Additionally, you’ll want to filter out all keywords that have not led to any sales. Why? Because our equation for calculating the optimal bid doesn’t work when sales are zero—the clicks for that keyword have no value at all.
Calculate the Optimal Bid
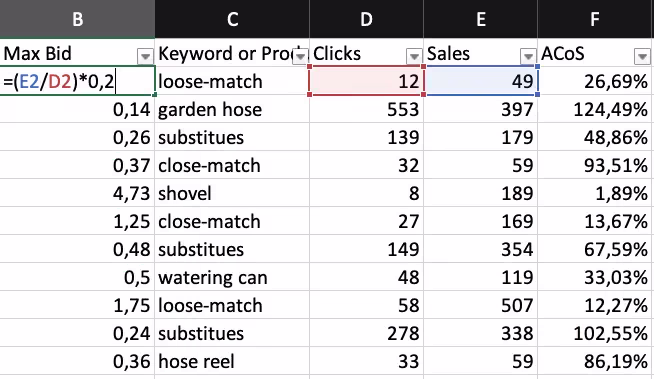
As we went through before, we can calculate the optimal bid with the equation: Bid = Click Value × ACOS target. But it would take a long time to calculate this manually for all keywords, so we’ll let Excel do the work for us.
This is easily done by dividing (in the first row of the "Max bid" column) the Excel cell for Sales by the one for Clicks. Then multiply this by your chosen ACOS target. You can then select the cell and easily copy it to all the underlying cells in the Max Bid column. And there you have it! Since different campaigns and different Ad Groups have different ACOS targets, it might be convenient to do this for a few campaigns at a time.
When you’ve set all the new bids you want, you can easily save the file and upload it to Amazon. Then your new bids are set. Simple, right? And with that, you’ve optimized your ads better than at least 95% of all other sellers!
Maximum Bids
It’s not uncommon for some keywords to have randomly converted extremely well, which can lead to bids being very high through the calculation above. Therefore, I would suggest setting a maximum bid, i.e., a bid that is the absolute maximum you can bid.
All the bids that are above this bid after you apply the equation need to be adjusted. Reasonable levels for maximum bids, I would say, range between $0.5 and $5, but often between $1 and $2. Everything depends on the product you are selling and its potential margins. So, if a bid is above your intended maximum bid, lower it to your maximum bid.
Keywords Without Data
As you just saw, we filtered out keywords with no sales. Some of the keywords you filtered out will be keywords that haven’t received any impressions. This may not seem like a problem, but it is.
Some keywords haven’t received any impressions because customers haven’t searched for that keyword, but other keywords have gotten the same result because your bid is too low. Competitors are placing higher bids, and your ads never show. This is, of course, not good since these ads could potentially be high-converting keywords for you, and you need to at least test how well these keywords would actually work. But don’t worry, we can certainly fix it!
Gradually Increase Bids
In the Bulk Operations file, you can easily identify keywords with low impressions and raise the bids for these keywords. As more impressions come in, you will be able to gather more data and then apply the optimization methods we’ve gone through earlier to the keyword. But first, the bids need to be raised.
I suggest you do this gradually through small increments each time. You do this most easily by first filtering out all non-keyword rows, i.e., campaigns, Ad Groups, etc. (just like when you optimized the bids earlier). Then you should filter out all keywords that have generated sales. After that, you want to start filtering out keywords that have very few impressions—those are the ones we want to raise the bids for. Once you’ve filtered out keywords with very few impressions, you can raise the bids for these. You don’t need to raise them much. A small increase should be enough, and hopefully, that will be enough for your ads to start showing. If it’s not enough, raise it a bit more the next time you optimize your ads. So, how much should you raise? I suggest about $0.1 per time (depending on how often you optimize your ads).
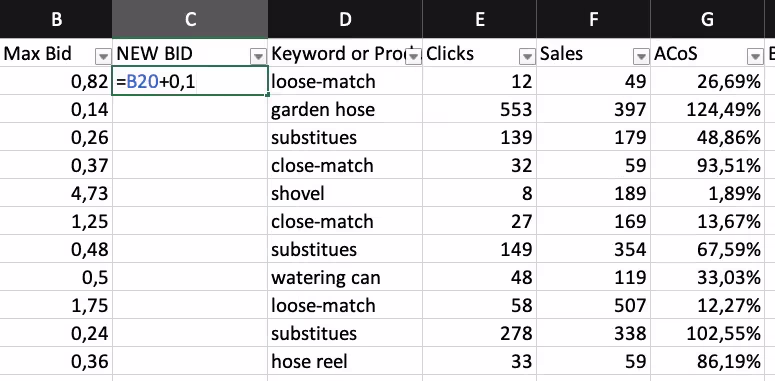
To quickly and easily do the above, create a new column next to the "Max bid" column. Then write a formula that copies the cells in Max Bid and adds a small increase, such as $0.1. You can then copy the new bids back into the Max Bid column and delete the column you just created. Done! Now you just need to upload the file, and Amazon will update your bids.
Hope you have gained a lot of knowledge about how to proceed to perform a more advanced ad optimization on Amazon using Excel!


.avif)
