How to List Products on Amazon: 5-Step Guide


Listing products on Amazon isn't difficult, but there are some important decisions that need to be made, and some of these decisions can be hard to undo later. That's why it's crucial to have a good understanding before you begin. In this post, I'll walk you through both the decisions you need to make and how to carry them out. I'll also show you exactly how to do the most basic tasks.
If you feel that you need help with listing your products, check out our services or contact us and we can help you to upload products, register shipments, and much more.
1. Prepare Texts and Data for Amazon
Every product page on Amazon has a few common elements. Some products also require special information, such as if they contain batteries or are edible. Since you can already be sure that you'll need certain information, I'll briefly summarize it here. However, I recommend reading through the entire post before you start gathering all the information. If you'd like a more detailed explanation of all the components of a product page, you can read this post: How Do Product Pages on Amazon Work?
1.1 Every Amazon product page has the following texts:
- Title: A title that quickly informs the customer about the product and sometimes provides extra details. It can be up to 250 characters long. I recommend around 120 characters.
- Bullet Points: Up to 5 different text sections, usually used to highlight the product's key features and benefits. This section is also often used to improve SEO. If you're selling through Seller Central, each bullet point can be up to 500 characters. I generally recommend sticking to around 250.
- Product Description: In addition to the above texts, product pages also have a product description. The product description can be much longer and is displayed further down on the product page, making it a perfect place for SEO. If you have a brand registry, you can create product descriptions with A+ Content, which includes images, related products, and more. The product description without A+ Content can be up to 2000 characters. My advice is to write as much as possible without compromising quality.
1.2 Every Amazon product page has the following numbers and codes:
- EAN Number: Every product on Amazon must have a unique identifier. EAN numbers are the most common for Swedish companies. If you don't already have EAN numbers for your products, you can obtain them from GS1. It is also possible to list products without EAN numbers, but this requires an exemption approved by Amazon.
- SKU Code: Every product on Amazon must have an SKU code. You can set the SKU code to whatever you want, which can be useful for matching products with other systems outside of Amazon, such as accounting. You can also let Amazon automatically generate the SKU code for products.
- Price: Not surprisingly, every product needs a final price for the consumer. This price includes any applicable VAT in Europe. In the US, the equivalent tax (Sales Tax) is added afterward. Check what applies in the country where you sell before setting the price.
- Product Size & Weight: If you are using Amazon FBA to handle logistics, you will also need to specify the shipping weight and dimensions.
1.3 Images on Amazon Product Pages:
- Main Photo: Every product must have a main image. This image has strict requirements, such as the background must be completely white and no other distracting elements may be in the image.
- Additional Images: Besides the main image, you can also upload more images, which I highly recommend. The more images, the more you can showcase.
2. Structure of Product Variations
Before you start listing products on Amazon, it's good to think about how you'll structure the product pages. Amazon allows for product variations, which enable you to list multiple different products on the same product page. You can read more about this here: Product Variations on Amazon. This is crucial and can be difficult to change later.
Once you've decided which products should be on the same product page and which should be on separate pages, you can move on to the next step.
3. Is the Product Already Listed?
Before you list a product, you should check if the product is already being sold on Amazon. On Amazon, the same product cannot have multiple product pages. If multiple sellers sell the same product, they will sell the product through the same product page. If the product you are listing is brand new and your company's own brand, you can be fairly certain that it isn't already being sold. However, it's also not uncommon for someone to be selling your company's products on Amazon without your knowledge.
3.1 Check if the product is already listed:
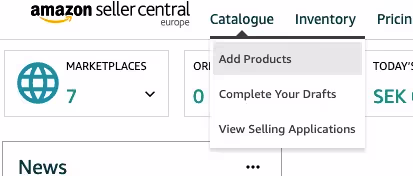
Step 1: Go to the menu and click on "Add Products" under "Catalogue".
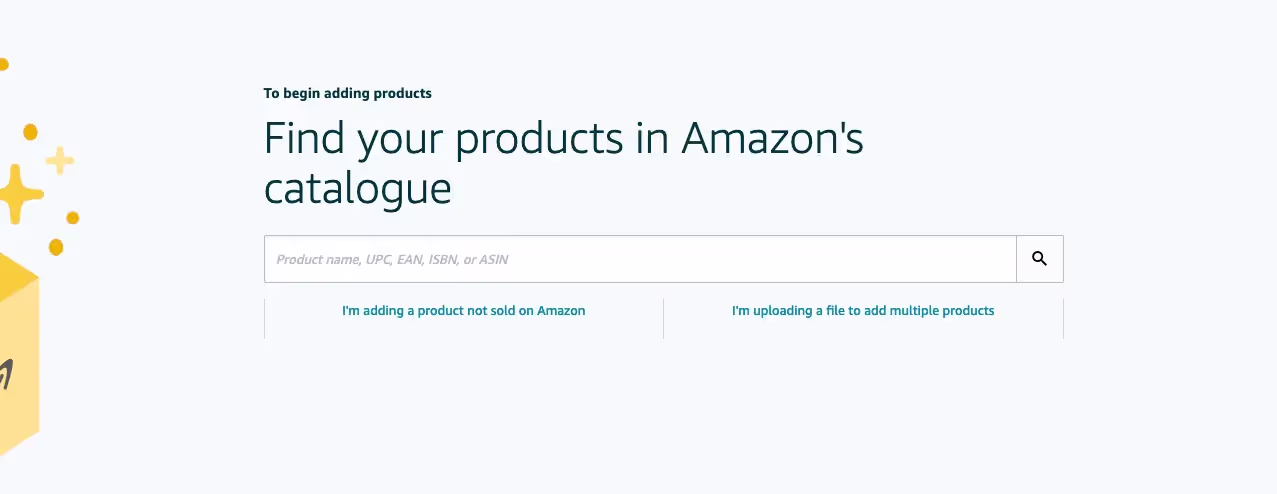
Step 2: Search by the EAN number in the search function Amazon provides for this purpose. You can also search by product name, but it's safer to search by the EAN number.
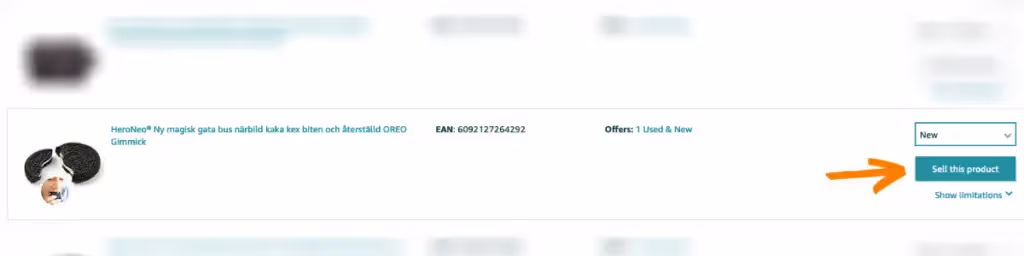
Step 3: After searching for the product, you will either get a result or not. If you don't get a result, it means the product isn't being sold on Amazon, and you can move on to the next step in this guide. If a matching result appears, the product is already being sold on Amazon.
In that case, you cannot create a new product page. But you can easily join the existing page. Click on "Sell this product" for the product that matches yours. A pop-up will then appear asking you to fill in some product data. Since you are joining an existing product page, you won't need to enter all the information required for a new product, but some data will still be needed, such as price. If you also want to change images, texts, and the like, you can do so by editing the product afterward.
4. Choose a Product Category for a New Product
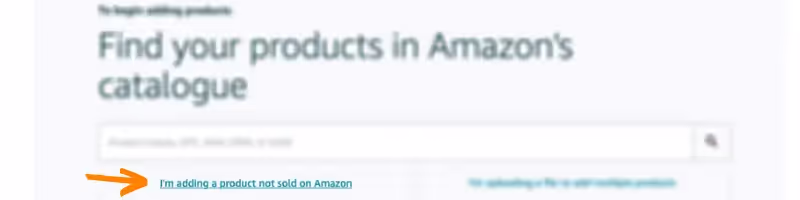
Step 1: If after the previous step you know that the product is new to Amazon, the next step is to choose a category. Go back to "Add products" under "Catalogue" and click on "I'm adding a product not sold on Amazon".
Step 2: Now it's time to choose a category.
- Navigate from broader categories to subcategories that fit the product.
- Then select the final category by clicking "Select category".
Sometimes it can be difficult to find a suitable category. A tip is to look at competitors on Amazon. Search for best-selling products similar to yours and see which category they are listed in. There are also "Other" categories available for products that don't fit into the listed subcategories. Once you've selected a category, it's time to upload all the product data.

5. Upload Product Data
Uploading product data is a big step, especially because so much happens during this process. All texts, numbers, data, and images must be uploaded, and this is also where we set up any product variations. In the first step below, I'll go through how you should handle product variations, but if that doesn't apply to you, you can skip ahead to the next step.
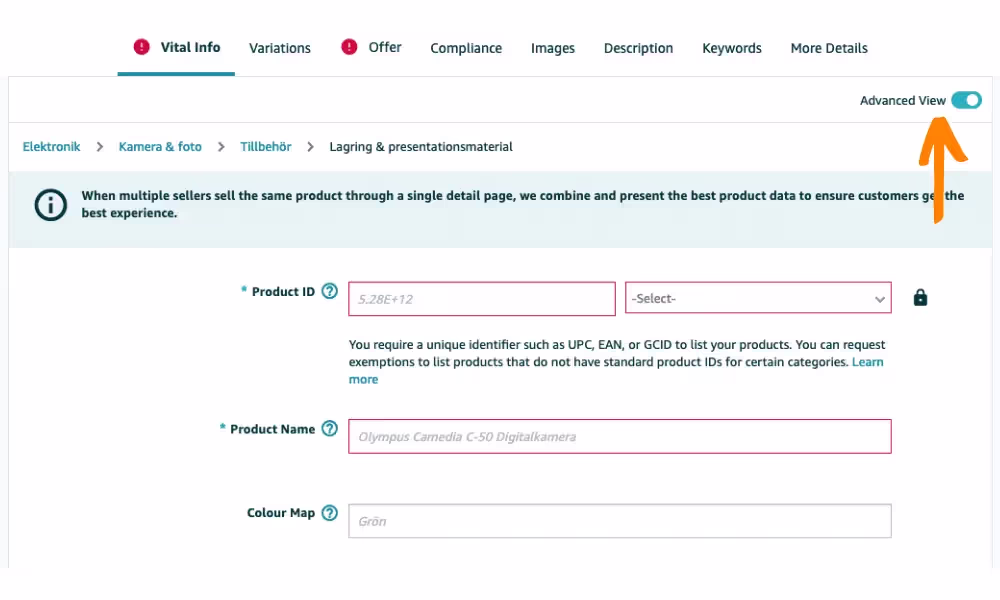
Before proceeding to the steps below, make sure you've reached the page to upload your product—it should look similar to the example below. Also, make sure to click on "Advanced View," so you don't miss many of the important settings.
5.1 Enter Product Variations
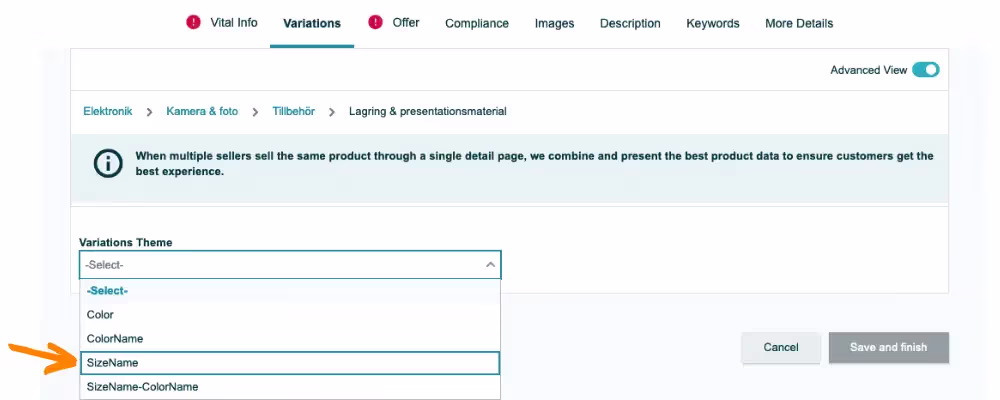
Step 1: If you're going to use product variations, first go to the page called "Variations". The first thing you need to do is select a "Variations Theme". This is the theme for how the products will vary from one another. There are many different variation themes, and they vary between product categories. Some categories have many options to choose from, while others have fewer. How you choose the variation theme depends on your specific products. Here are some examples:
- If it's a t-shirt that comes in different colors, "Color" or "ColorName" are good choices.
- If it's a gum package that comes in different sizes, "Size" or "SizeName" are good options.
- If it's a pair of pants that vary in both color and size, "SizeName-ColorName" is a good option. This gives the product two types of variations, both size and color.
In the example below, the product I'm listing is a memory card for a camera. The memory cards come in different memory sizes (32GB, 64GB). Therefore, I choose "SizeName" as the option. Variation themes ending with "Name" are often more customizable than other options because you specify the size name yourself instead of choosing options from a list.
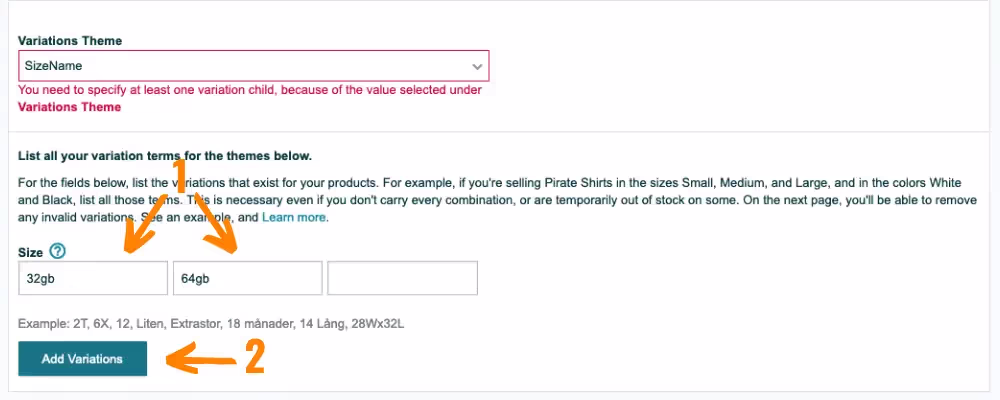
Step 2: After selecting a variation theme, you need to specify the different variations. Make sure to be clear about what the variation is. Then click on "Add Variations".
- If you have color variations, this is where you enter the different colors.
- If you have quantity variations, you can enter the exact number here—e.g., "20 units".
In the example below, the products vary by memory size. Therefore, I enter the different memory sizes as the two variations.
Step 3: Once the variations are added, it's time to enter other necessary data for the variations. As soon as you clicked "Add variations" in the previous step, the different variations will appear at the bottom of the page. You will then need to fill in the following information:
- Seller SKU: The SKU code for the unique variation. You can choose to leave this field blank, and Amazon will automatically generate an SKU code.
- Product ID: This is the unique product ID for the specific variation, such as an EAN or UPC number.
- Product ID Type: Here, you specify what type of product ID you entered in the previous field. For most, this is "EAN".
- Condition: On Amazon, you can sell both new and used products. Therefore, it's important to specify the condition of the product here.
- Your Price: Pretty self-explanatory. Here, you enter the price of the product.
- Quantity: Here, you enter the number of units of the product you're selling. If you're going to sell this product using FBA, you can set this number to 0. But if you're shipping to the end customer yourself, enter how many products you have in stock here. You can always change this later.
Once you've entered this information, you're done with the variations. You can later go in and edit data for specific variations (child listings). You do this by simply editing the individual variations. Often, this is necessary to at least change images, but also texts and product data can be unique to the variations.

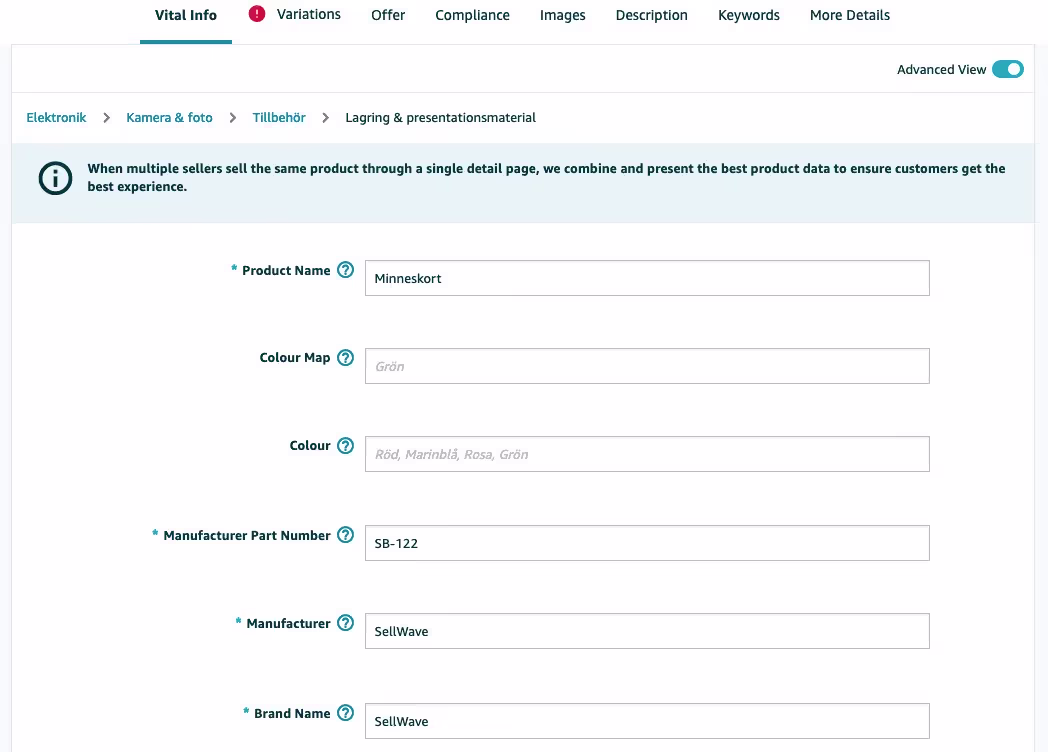
5.2 Enter Vital Info
Under "Vital Info", there is a lot of important information that needs to be entered, including the product name, brand, manufacturer, and possibly a few other details. If this is a product page without product variations, you also need to enter the EAN number here (or another product identifier).
5.3 What to Enter Under "Offer"?
Under "Offer", there are two important sections.
- The first section consists of Seller SKU, Condition, and Your Price. You don't need to fill this in if it's a product page with variations because you entered that data in the first step. If you want an explanation of the different fields, see 5.1) Step 3.
- The second section is the choice between selling the product with FBA or FBM. See the image below.
- In addition to these sections, there is some other data you can enter, but it is usually not applicable. Examples include Product Tax Code, limited-time price reductions, handling time, and the like. The reason why this often doesn't need to be filled in is that the entire account has a standard handling time, shipping time, tax code, etc.

5.4 Fill in "Compliance"
Under "Compliance", Amazon asks you to fill in information related to safety. Often this is about any batteries in the product. However, it can also be about other things depending on the product category. If the product is required by law to have a "Safety Data Sheet", you need to link to it here. If you suspect you'll need to fill in details here, I recommend reading through Amazon's documentation on Compliance.
5.5 "Images", How to Upload Images
The "Images" page is easy to navigate. You simply upload images directly in the platform. As I described in the first section of this post, there are certain requirements from Amazon. Here are Amazon's exact requirements:
- The product must fill at least 85% of the image. Images should only show the product being sold, with little or no props and no logos, watermarks, or images in the image.
- The main image must have a completely white background, consist of a photo (not a drawing or animation), and not include accessories. The image should only contain text if it's part of the product.
- Images should be at least 1,000 pixels on the longest side and at least 500 pixels on the shortest side to enable zoom.
- Images must not exceed 10,000 pixels on the longest side.
- JPEG is the preferred image format, but you can also use PNG, TIFF, and GIF files.
5.6 What to Enter Under "Description"?
As I mentioned in the introductory sections of this post, every product page has Bullet Points and a product description. This is what you can enter on this part of Amazon's product registration. You can also enter a "Legal Disclaimer" if needed for the specific product. If you want to use A+ Content on the product page, that is added separately.
5.6.1 Product Description
- The product description itself is something I won't go into more detail on in this post, but I want to mention one aspect, which is the formatting of it. If you paste in different text sections here, Amazon will bundle all the text into one paragraph without any styling (bold, italic, etc.). However, you can style the text with HTML. If you don't know HTML or just want to make it easy for yourself, you can use this tool: Amazon HTML Styling Tool. In that tool, you can paste in regular text, style the text, and then get the HTML format that you can paste into Amazon.
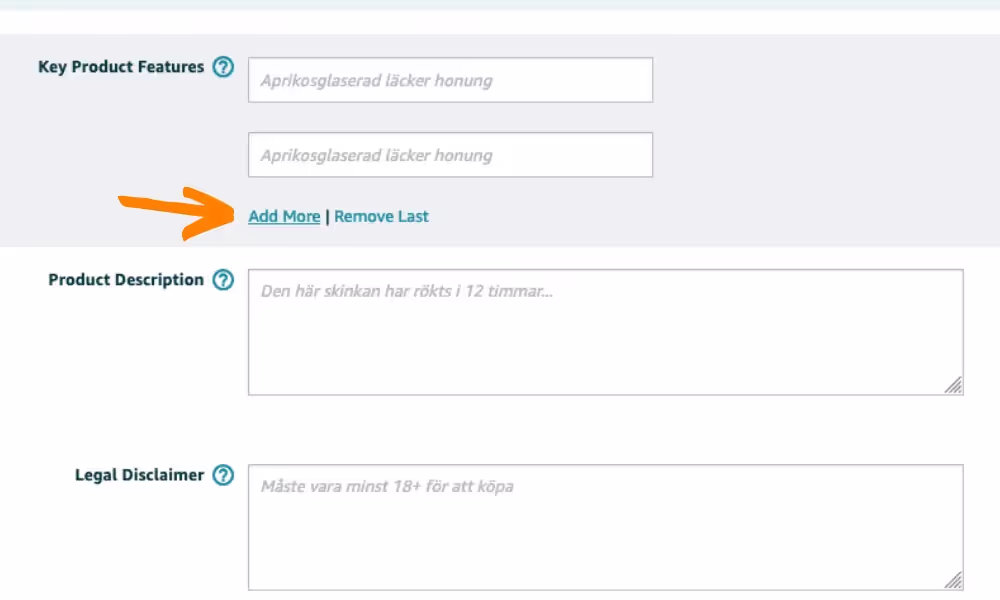
5.6.2 Bullet Points
- What I (and the Amazon community) call Bullet Points, Amazon calls here "Key Product Features". To enter all five Bullet Points that are available, you need to click on "Add More" (see the image below) until you see five fields. Each field is simply a Bullet Point.
5.7 "Keywords", What Is It?
Under Keywords, there are various fields, but there's essentially only one field you need to focus on, which is Search Terms. In this field, you can enter keywords that you want the product page to appear for on Amazon. Of course, Amazon also looks at the text in the title, Bullet Points, and product description, and matches the product with the words used there. But this is a great opportunity to add keywords that you want the product to appear for, but perhaps don't want the product page to contain.
For example, maybe the product in question is very affordable, and you want the product to appear in searches that include the word "cheap". However, you might not want the title to say "Cheap" as it could harm the brand image. This is a perfect place to enter such a keyword.
5.8 What Should Be Entered Under "More Details"?
The last section of the registration is More Details, where you can enter all sorts of data. Depending on the product category, different fields will appear, but there are some that always show up. In general, it's not mandatory to fill in any of these fields, but depending on the product and target audience, it might be worth going through the fields and filling in those you think the customer would want to know before making a purchase. Ideally, you would fill in all the fields, but it's a matter of time, especially if you're listing many products.
However, there are two fields that you will need to fill in if you're selling the product using Amazon FBA. These are the shipping weight and shipping dimensions. Since Amazon bases its costs on this, it must be filled in. That being said, you can also skip this and fill it in when you register the first shipment of the product to Amazon's warehouse.
6. Finalize the Product Listing
When all the necessary fields are filled in, simply click "Save and Finish" in the top right corner. The product page will then be saved, and it will take between 0 and 30 minutes for Amazon's system to process all the data and publish the product pages. Usually, it happens faster. The product can then be found under "Manage Inventory".
Also, remember that if you've listed a product page with variations, you'll now need to go in and edit each individual variation if you want to upload different images, data, or texts.
That's It!
I hope this guide was helpful and that you were able to successfully list your products on Amazon. If you think someone you know could benefit from this guide, I'd be extremely grateful if you could share it. Don't forget to check out the SellWave blog. Good luck!


.avif)
