Sending Products to Amazon's Warehouse (8 Steps)


.avif)
Amazon offers a service called Fulfillment by Amazon (FBA). With FBA, your company can let Amazon handle the storage and shipping of all products sold through their platform. But to take advantage of FBA, you need to send your products to Amazon's warehouse. In this guide, I will walk you through how to register a shipment to Amazon's FBA warehouse in 8 simple steps.
Want to know the best way to manage Amazon's inventory? Check out "Amazon FBA vs FBM: - Which Method is Best?" where I go over the pros and cons of the available options.
Step 0 - Preparing to Ship to Amazon FBA
To ship to Amazon, you'll obviously need to set up an account on Amazon, but you'll also need to have listed all your products on Amazon. If you want clear walkthroughs on how to list products, ship products, and do everything else required on Amazon's platform, check out our services or contact us and we will help you from there.
Step 1 - Selecting Products for the Shipment
The first thing you need to do when registering a shipment is to choose which products you want to send. There are two ways to do this:
- Via Manage Inventory in Seller Central - This is easiest when sending a smaller number of different types of items.
- Upload a File through Amazon’s Bulk Upload - This is easier when sending a larger number of different items.
1.1) Via Manage Inventory in Seller Central
If you are sending a smaller number of items, I suggest using this method. I also recommend using this method if it’s your first time registering a shipment on Amazon, regardless of the number of items.
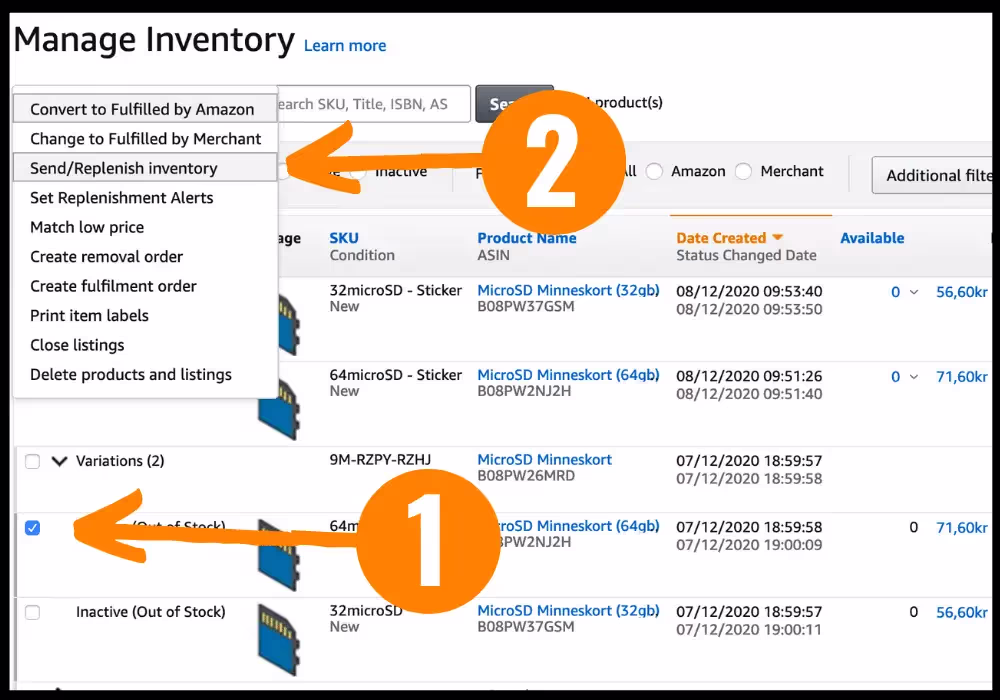
- Go to Manage Inventory under Inventory and select the products you want to send.
- Then click on Action on Selected in the top left corner. This opens the menu shown below in the image.
- Choose Send/Replenish Inventory. Done! Now you can move on to Step 2.
1.2) Upload a File through Amazon’s Bulk Upload
If you are shipping a larger number of products to Amazon, it might be easier to handle the product selection using Excel.
- Go to Manage FBA Shipments under Inventory.
- Click to continue to Upload Shipping Plan File.
- Click on Download Template. You will now download an Excel file. Fill in the file according to the instructions included in the file. You’ll probably find it easiest to open the file in Excel and change the format to an Excel format. Save the file in txt format
- Go back to Amazon and upload the txt file. Amazon will now review the file and register the shipment, or flag any errors that may have crept in. If no errors occur, you’ll find the shipment under Shipping Plans, which you can find on the Shipping Queue page.

Step 2 - Select the Number of Products to be Shipped
After you have chosen which products to send, you must decide how many products to ship. This process currently looks a bit different depending on which platform you sell on. The steps are essentially the same, but the interface may look very different. Some of the steps I go through below may therefore look a little different for you.
2.1) Case Packed or Individual Products
The first step you’ll encounter is whether the products should be sent as Case Packed or Individual Products. I recommend Case Packed.
- Case Packed - Means that different items are packed in individual packaging. For example, you can send product X in three different boxes with the same number of units in each, and you can package product Y in a similar way. But you cannot mix product X and Y in the same box.
- Individual Products - This is the opposite of Case Packed. Different products can be packed in the same boxes. And the same item can be packed in different boxes with different numbers of units in each.
2.2) Number of Products and Boxes
The next step is to select how many products to ship. If you use Case Packed, you also need to specify how many units are in each box and how many boxes you are sending.
2.3) Product Weight and Dimensions
If you did not specify shipping weight and shipping dimensions when you added the product to Amazon, Amazon will ask for this information at this stage. Amazon needs this information for their FBA service. Provide the information and then move on.
Step 3 - Prepare Products
Some products require special preparation when it comes to packaging. For example, products with liquids (shampoo, soaps, etc.) need extra protective packaging. You can find all of Amazon's Prep Guidance here. Make sure to find out which of your products need extra preparation.
Once you know which products need extra preparation, you also need to mark this on Amazon. You do this for each individual item. If no extra preparation is required, this must also be marked.
3.1) Let Amazon Do the Work
If extra preparation is required, you can let Amazon handle the preparations for you. Amazon will do the work for a fee of between $0.4 to $2 (or equivalent amounts in other currencies). If you prefer to do the preparations yourself, that’s perfectly fine. Either way, you need to label the products in Amazon’s interface with who will do this work. Once you have completed this, you can move on to the next step.
Step 4 - Label Products
Products you send to Amazon must be scannable at the warehouse. This means that each product must be labeled, either with a barcode (EAN, GTIN, UPC) or with an FNSKU. FNSKU is an internal Amazon code and is often referred to as an Amazon barcode. You have already previously chosen how each product should be labeled with either a standard barcode (e.g., EAN) or an FNSKU. You do this when you register the products (listings).
4.1) FNSKU Codes
If one or more of the items are set to use an FNSKU code, you can specify at this stage who will label the products. You can either apply these barcodes yourself or pay Amazon $0.3 per product to do the job for you. If you are going to let Amazon do the work, each product must have a standard barcode when sent to Amazon. Otherwise, Amazon won’t know which product should have which FNSKU code. At this stage, you can also download the FNSKU codes if you wish to apply them yourself.
Step 5 - Review Shipments
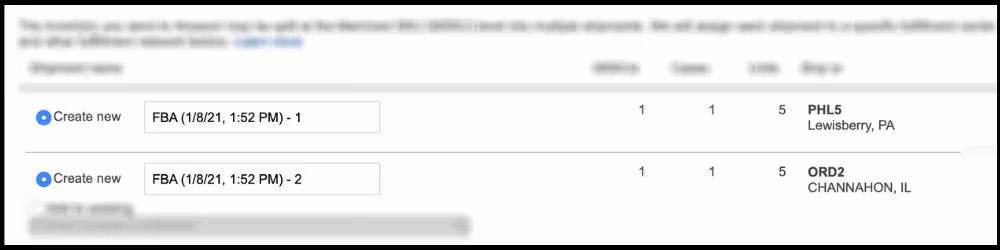
Now that all products, their quantities, and various product data are ready, it’s time to review the actual shipments. At this stage, Amazon has reviewed all the data and chosen where you should send the products. In most countries where Amazon operates, they have many warehouses. As a result, Amazon may split the products and ask you to send different quantities to different warehouses.
Each shipment is given an address, and the number of products to be sent to each destination is specified. Below, you see an example of when a shipment was split into two different shipping destinations. Before proceeding, you must now approve the various shipments. You will then need to go through each shipment one by one. You do this by clicking on Work on Shipment and then proceed to the next step.
Step 6 - Prepare Shipment
This step is quite extensive but relatively simple. On the page you are now on, you can find the shipping address, shipment name and ID, and a lot of other information. I have divided the step to make it as clear as possible.
6.1) Small Parcel Delivery or Less Than Truckload
The first thing you need to decide is whether to ship the products in separate boxes or on pallets. This usually depends on how many products you are sending. If the shipment was split unevenly in Step 5, it may well be that you want to ship one of the shipments via pallet and another with individual boxes.
- Small Parcel Delivery - Individual boxes.
- Less Than a Truckload - Pallets.
6.2) Carrier
In the same step where you choose the shipping method (see above), you also choose which carrier to use. You can either use an Amazon Partnered Carrier or other options, which is often the choice for Swedish sellers.
6.3) Shipment Packaging
Regardless of your choice between Case Packed and Individual Products (2.1), you can now choose several options for how to ship the products. For example, if you chose Case Packed, you can now choose to ship each box separately or place multiple boxes in a larger box (master carton). You can read more about it here: Amazon packaging requirements.
After you make your choice, Amazon will ask for more details about the boxes. If you are shipping individual boxes, you need to specify the size and weight of the boxes. You will also need to confirm the number of products per box and the number of boxes.
6.4) Shipping Labels - Boxes
For Amazon to know which box is which, each box must be labeled with labels from Amazon. This step is no more complicated than that.
- First, choose which boxes you want to print labels for. You can either print all the box labels at once or print them in batches.
- Then choose the type of label you want to print. This depends largely on what kind of label printer you are using (or regular printer). Choose the option that suits you best.
- Then click on Generate Box Labels. You will get a PDF that you can print directly, or download and send to the device/person that will print them (e.g., the company’s warehouse).
If you are using an Amazon Partnered Carrier (see 7.2), you can also print the shipping label here. If not, you can get the shipping label from your carrier.
6.5) Shipping Labels - Pallets
If you are shipping pallets to Amazon, these must also have labels for Amazon to identify them. Just like above, choose how many pallets you want to print labels for, then choose the label type, and finally, generate the labels.
Each pallet must have four labels, unlike individual boxes, which only need one label. The labels should be attached high and centered on each side.
6.6) Tracking
After you have gone through all the steps above, you are ready to complete the shipment. Once you have done this, you are almost done. You now need to ensure that the products are shipped and then return to Amazon to enter the tracking number. For pallet shipments, you enter the BOL number.
Step 7 - Wait for Delivery
Done! You have now completed the entire shipment process on Amazon. All that’s left to do is wait for the products to be delivered to Amazon. Once the delivery is made, Amazon will start unpacking the products. This can take some time, but you will see when the delivery is received and when unpacking is complete.
You don’t need to actively monitor this, but it’s a good idea to check the number of products received after the delivery. If these differ from the number of products you shipped, it might be something you need to take a closer look at. However, once the products are unpacked, everything is done, and customers can start buying your products.
I hope this guide was helpful and that you have successfully shipped your products to Amazon. If you think someone you know would benefit from this guide, I would greatly appreciate it if you could share it. Don’t forget to check out the rest of the posts on the SellWave blog.
Good luck, and all the best!


.avif)
